How to Setup SEA Failover on DUAL VIO servers

http://www-01.ibm.com/support/docview.wss?uid=isg3T1011040


Cluster Aware AIX (CAA)

http://lparbox.com/how-to/aix/13


VIOS 구성시 고려할 tuning parameter

http://aixnote.tistory.com/226


How to configure a VIOS Media Repository/Virtual Media Library (ex. AIX Install/Restore)

http://www-01.ibm.com/support/docview.wss?uid=isg3T1013047


VIO Server Howto

http://www.unixwerk.eu/aix/ios-howto.html

'IBM AIX > VIOS' 카테고리의 다른 글

VIOS DLPAR  (0) 2017.08.31
vios  (0) 2016.07.19
LPM by IBM  (0) 2016.07.18
LPM  (0) 2016.07.18
VSCSI  (0) 2016.07.18


# diag
---> Task Selection
---> RAID Array Manager
---> PCI-X SCSI Disk Array Manager
---> List PCI-X SCSI Disk Array Configuration
---> sisioa1 Available 06-08 PCI-X Dual Channel U320 SCSI RAID


Activate the LED indicator of the physical disk to locate it on the rack.

# diag
---> Task Selection
---> Hot Plug Task
---> SCSI and SCSI RAID Hot Plug Manager
---> Replace/Remove a Device Attached to an SCSI Hot Swap Enclosure
---> select failed disk here(pdisk#)


A message will appear in regards to an LED and Remove state. Find the physical drive that is now flashing amber from its LED and remove it from the array. After you remove the failed physical drive, replace it with the new unit.
Hit Enter on that message screen to remove that slot from the "remove state".

# diag
---> Task Selection
---> Hot Plug Task
---> SCSI and SCSI RAID Hot Plug Manager
---> Configure Added/Replaced Devices


# diag
---> Task Selection
---> Log Repair Action (Select affected disk)


Rebuild the array

# diag
---> Task Selection
---> RAID Array Manager
---> PCI-X SCSI Disk Array Manager
---> Reconstruct a PCI-X SCSI Disk Array

'IBM AIX' 카테고리의 다른 글

https://www.ibm.com/support/knowledgecenter/en/ssw_aix_61/com.ibm.aix.networkcomm/roce_rdmaconfiguration.htm  (0) 2017.05.11
HMC 에서 vio 설치  (0) 2016.09.01
S824 MES  (0) 2016.08.16
RMC  (0) 2016.07.18
sh history  (1) 2016.06.01


HMC의 vio 이미지로 vio 설치 방법

https://theibmi.org/2014/11/26/how-to-install-any-operating-system-on-power-remotly/

'IBM AIX' 카테고리의 다른 글

https://www.ibm.com/support/knowledgecenter/en/ssw_aix_61/com.ibm.aix.networkcomm/roce_rdmaconfiguration.htm  (0) 2017.05.11
AIX H/W RAID Disk replacement  (0) 2016.09.07
S824 MES  (0) 2016.08.16
RMC  (0) 2016.07.18
sh history  (1) 2016.06.01


HANA DB requirement

'HANA DB' 카테고리의 다른 글

SUSE Linux Enterprise Server for SAP Applications 12 SP1  (0) 2017.02.22
SAP HANA DB 교육2  (0) 2017.02.22
SAP HANA  (0) 2017.02.20
HANA DB 관련  (0) 2016.08.28


HANA DB 관련.

http://saphanadb.com/?p=413

'HANA DB' 카테고리의 다른 글

SUSE Linux Enterprise Server for SAP Applications 12 SP1  (0) 2017.02.22
SAP HANA DB 교육2  (0) 2017.02.22
SAP HANA  (0) 2017.02.20
HANA DB requirement  (0) 2016.08.29


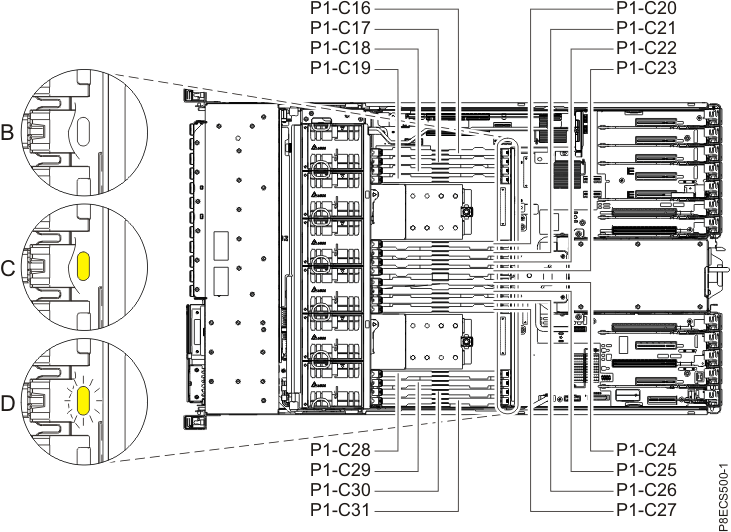
igure 1. Memory module plugging sequence

Memory module plugging sequence
  • The 8247-42L, 8286-41A, or 8286-42A system can support short memory modules with a filler to latch into the chassis, along with tall memory modules of 128 GB.
  • The 8286-41A system supports a minimum of one memory module and provides a minimum of 16 GB memory.
  • The 8286-42A or 8247-42L system supports a minimum of two memory modules and provides a minimum of 32 GB memory.
  • A memory module pair must be identical and can be different from the other pairs of memory modules.
  • The 8247-42L, 8286-41A, or 8286-42A system supports various feature codes such as FC EM8B, FC EM8C, FC EM8D, and FC EM8E that have different memory capacities. Ensure that the same feature code are installed in pairs.
    Note: To determine if your memory modules have the same feature code, compare the part numbers of the memory modules installed in the system to the memory modules being installed. If you need additional help, contact your next level of support.
Table 1. Memory module plugging sequence for the 8247-42L, 8286-41A, or 8286-42A system
Number of system processors Plugging sequence
One system processor module (8286-41A, 8286-42A, or 8247-42L)
  1. Install the first memory module at location C16.
  2. Install the second memory module at location C18.
    Note: First and second memory module must be identical.
  3. Install the third identical memory module pair at location C21 and C23.
  4. Install the fourth identical memory module pair at location C17 and C19.
  5. Install the fifth identical memory module pair at location C20 and C22.
Two system processor modules (8286-42A or 8247-42L)
  1. Install the first identical memory module pair at location C16 and C18.
  2. Install the second identical memory module pair at location C24 and C26.
  3. Install the third identical memory module pair at location C21 and C23.
  4. Install the fourth identical memory module pair at location C29 and C31.
  5. Install the fifth identical memory module pair at location C17 and C19.
  6. Install the sixth identical memory module pair at location C25 and C27.
  7. Install the seventh identical memory module pair at location C20 and C22.
  8. Install the eighth identical memory module pair at location C28 and C30.


http://www.ibm.com/support/knowledgecenter/en/8247-42L/p8had/p8had_sascabling5887.htm?cp=8286-42A


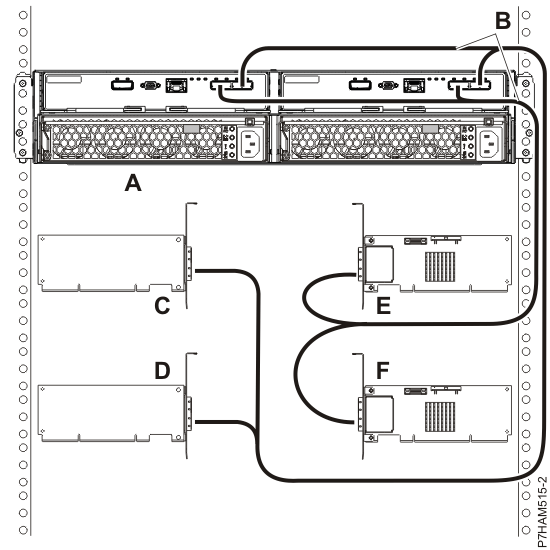
    1. Four single FC 5901 or FC 5278 adapters to one 5887 enclosure via a mode 4 connection.
    2. 5887 enclosure with four sets of six hard disk drives (HDDs).
    • Connection using dual SAS X cables to connect to the 5887 enclosure.
    • Supported only on AIX and Linux systems.
    1. Figure 5. Mode 4 connection of a 5887 enclosure by using X cables to four single SAS adapters
    2. Mode 4 connection of a 5887 enclosure by using X cables to four single SAS adapters
    3. Note: You must match the drive slots that you are using to the connector on the 5887 enclosure, and then to the correct leg of the X cable. For details, see 5887 disk drive enclosure.


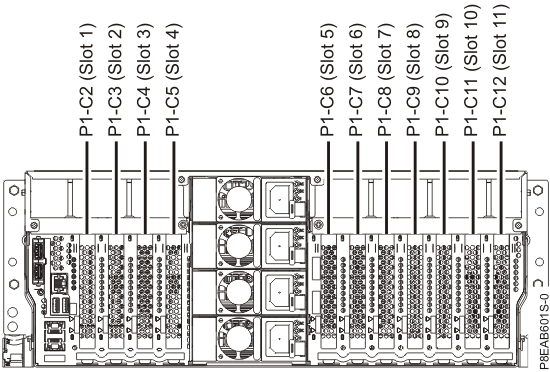
    http://www.ibm.com/support/knowledgecenter/en/8286-42A/p8eab/p8eab_82x_84x_slot_details.htm


    Rear view of a rack-mounted 8286-41A and 8286-42A system with PCIe slots location codes. 

    'IBM AIX' 카테고리의 다른 글

    AIX H/W RAID Disk replacement  (0) 2016.09.07
    HMC 에서 vio 설치  (0) 2016.09.01
    RMC  (0) 2016.07.18
    sh history  (1) 2016.06.01
    sh history  (0) 2016.06.01


    /var/lib/accountsservice/users

    'IBM PowerLinux > REDHAT' 카테고리의 다른 글

    Hot add, remove, rescan of SCSI devices on Linux  (0) 2018.07.09
    Redhat Nouveau 내장그래픽카드 nvidia 드라이버 설치 삭제  (0) 2018.07.03
    CentOS 7 bonding nmcli  (0) 2017.11.01
    Linux semaphore  (0) 2016.07.11
    NETWORK Bonding  (0) 2016.06.29


    http://m.storefarm.naver.com/tnimall/products/379758819?NaPm=ct%3Dirmtkdhc%7Cci%3Dcheckout%7Ctr%3Dmd%7Ctrx%3D50069%7Chk%3Db807b9ffddad4425ace2a65f991a84ce388b486d

    '잡동사니' 카테고리의 다른 글

    V7000 CLI commands  (0) 2017.06.23
    거실  (0) 2016.07.05
    [투싼ix] 도어내캐치  (1) 2016.04.04
    [투싼ix] 클러스터 이오나이저  (0) 2016.04.04


    http://fibrevillage.com/storage/279-hot-add-remove-rescan-of-scsi-devices-on-linux


    Hot add, remove, rescan of SCSI devices on Linux

    Finding informations about SCSI devices

    The first problem when working with SCSI devices might be to map informations you got from /proc/scsi/scsi to the device names the kernel uses like /dev/sda and so on.

    Or you can use lsscsi utlity. Here's an example:

    # lsscsi
    [0:0:0:0]    disk    ATA      SEAGATE ST31000N SU0E  /dev/sda
    [0:0:1:0]    disk    ATA      SEAGATE ST31000N SU0E  /dev/sdb
    ...
    [1:0:1:0]    disk    ATA      SEAGATE ST31000N SU0E  /dev/sdj
    [1:0:2:0]    disk    ATA      SEAGATE ST31000N SU0E  /dev/sdk
    [1:0:3:0]    disk    ATA      HITACHI H7210CA3 A3CB  /dev/sdl
    [1:0:4:0]    disk    ATA      HITACHI HUA7210S AC5A  /dev/sdm
    ...
    [5:0:7:0]    disk    ATA      SEAGATE ST31000N SU0D  /dev/sdav
    [6:0:0:0]    mediumx IBM      TS3500           0104  /dev/sch0
    [6:0:1:0]    tape    IBM      ULT3580-TD5      0104  /dev/st0
    [6:0:2:0]    tape    IBM      ULT3580-TD5      0104  /dev/st1

    You can find same info by checking /proc/scsi/scsi

    # cat /proc/scsi/scsi
    Attached devices:
    Host: scsi0 Channel: 00 Id: 00 Lun: 00
      Vendor: ATA      Model: SEAGATE ST31000N Rev: SU0E
      Type:   Direct-Access                    ANSI  SCSI revision: 05
    Host: scsi0 Channel: 00 Id: 01 Lun: 00
      Vendor: ATA      Model: SEAGATE ST31000N Rev: SU0E
      Type:   Direct-Access                    ANSI  SCSI revision: 05
    Host: scsi0 Channel: 00 Id: 02 Lun: 00
      Vendor: ATA      Model: SEAGATE ST31000N Rev: SU0E
      Type:   Direct-Access                    ANSI  SCSI revision: 05
    ...

    In the example above

    Host: scsi0 Channel: 00 Id: 01 Lun: 00 
    is the same device of [0:0:0:0] in the output of lsscsi

    Where the output

              h == hostadapter id (first one being 0)
              c == SCSI channel on hostadapter (first one being 0)
              t == ID
              l == LUN (first one being 0)

    Rescan of a SCSI bus

    Surely reboot a server will let the scsi device get rescanned. But this is not the prefered way. The easiest way is to rescan the whole SCSI bus which will enable the Linux kernel to detect new devices!

    To issue a SCSI bus rescan you must know on which bus you've added the device. If you don't know which bus and if there are mutliple buses on the system you can rescan each bus which will be somehow annoying but will not interrupt the system.
    To initiate a SCSI bus rescan type

    echo "- - -" > /sys/class/scsi_host/host<H>/scan

    where H stands for the SCSI bus you want to scan.

    # lsscsi
    ...
    [1:0:0:7]    disk    IBM      1814      FAStT  1060  /dev/sdb
    [1:0:0:8]    disk    IBM      1814      FAStT  1060  /dev/sdc
    [1:0:0:10]   disk    IBM      1814      FAStT  1060  /dev/sde
    # echo "- - -" > /sys/class/scsi_host/host1/scan
    # lsscsi
    ...
    [1:0:0:7]    disk    IBM      1814      FAStT  1060  /dev/sdb
    [1:0:0:8]    disk    IBM      1814      FAStT  1060  /dev/sdc
    [1:0:0:9]    disk    IBM      1814      FAStT  1060  /dev/sdd
    [1:0:0:10]   disk    IBM      1814      FAStT  1060  /dev/sde

    Well done, we got /dev/sdd back.

    By the way this does not only work for disks but also for SCSI CD/DVD devices.

    You can still use the old way, to get sdd back

    echo "scsi add-single-device 1 0 0 9" > /proc/scsi/scsi

    For more devices, you have to repeat the same for all devices

    Deletion of a SCSI Device

    There might be the situation where you must remove a SCSI device from the system.

    Easy by using

        echo 1 > /sys/class/scsi_device/h:c:t:l/device/delete
        or
        echo 1 > /sys/block/<dev>/device/delete
        where <dev> is like sda or sdb etc..

    Here's an example:

    # echo 1 > /sys/block/sdau/device/delete 
    # lsscsi | grep sdau
    #

    Now you see the device sdau is gone.

    In old way, this is what you would like to do

    echo "scsi remove-single-device h c t l" > /proc/scsi/scsi

    Add a SCSI Device back

    Surely this can be done just rescan the SCSI bus that the disk seats inuse wildcard like below

        echo "- - -" > /sys/class/scsi_host/host<h>/scan

    You can also do this if you know the device SCSI location h:c:t:l

        echo "c t l" >  /sys/class/scsi_host/host<h>/scan

    Old way

        echo "scsi add-single-device a b c d" > /proc/scsi/scsi

    Rescan of a SCSI Device

    The problem of a SCSI bus rescan is, that it will only detect new devices. Can a existing or missing device be rescanned?

    Sure, here is it

    echo 1 > /sys/block/sdau/device/rescan 
    or
    echo 1 > /sys/class/scsi_device/h:c:t:l/device/rescan

     In SAN environment, there is a easier way to manage SAN scsi devices, see Sysfs fibre channel tools

    'IBM PowerLinux' 카테고리의 다른 글

    Linux에서 소프트웨어 RAID 구성  (0) 2017.02.21
    linux scan device   (0) 2016.10.22
    Linux Monitoring  (0) 2016.05.26
    Linux CPU 하이퍼쓰레드 HT 기능 확인  (0) 2016.05.26
    Linux CPU information 정보 확인  (0) 2016.05.26


    A Brocade Switch CLI Zoning Configuration Walkthrough

    Scenario:

    A new VMware host server has been purchased with a couple of Fibre Channel (FC) HBAs. You are tasked with patching the fibre cables into a Fibre Channel switch stack pair – one fibre cable per switch – and then need to configure the zoning on the FC switches to support connection to an FC SAN.

    Walkthrough:

    Note: The output examples below have been truncated to show just the most interesting bits. In the examples we are configuring the zoning for a new host called ESX03, have connected the FC HBA's into ports number 8 on each FC switch. The FC switches are called FCSW01 and FCSW02. The FC switches used were HP 4/16 B-Series (Brocade) running Fabric O/S 6.2.2d. And the SAN is a HP EVA with two controllers (EVA_ContrA and EVA_ContrB.)

    Using a tool like Putty (for SSH, Telnet, Serial, ...) or similar, and via a connection to a fibre channel switch using either a serial console connection or ethernet management interface; log in to the CLI and run these commands:

    Step 1:> switchshow
    Run the switchshow command to find the zoning config name and WWN of newly connected HBA. Copy the WWN for later use.

    Example:
    The example below shows the config name "Company_Default" and looking on the line for port 8 gives us the WWN of connected FC HBA

    FCSW01:admin> switchshow
    zoning: ON (Company_Default)

    Area Port Media Speed State Proto
    =====================================
    8 8 id N4 Online F-Port 10:00:00:00:c9:83:63:1d

    Step 2:> cfgshow
    Run the cfgshow command to display the configuration and see how the zoning is currently configured.

    Example:
    The example below shows how the ESX02 zone (ESX02z) is configured. The ESX02 zone contains the EVA SAN's controller A port 1 and controller B port 1 (controller ports 2 are plugged into FCSW02,) and the ESX02 hosts FC HBA which is connected into FCSW01.) Also displayed are the aliases used and their associated WWNs.

    FCSW01:admin> cfgshow
    Defined configuration:
    cfg: Company_Default
    ESX02z
    zone: ESX02z EVA_ContrBP1; EVA_ContrAP1; ESX02
    alias: EVA_ContrBP1 50:00:1f:e1:50:0b:81:5c
    alias: EVA_ContrAP1 50:00:1f:e1:50:0b:81:58
    alias: ESX02_1 10:00:00:00:c9:5e:8d:06

    Effective configuration:
    cfg: Company_Default
    zone: S_ESX02z
    50:00:1f:e1:50:0b:81:5c
    50:00:1f:e1:50:0b:81:58
    10:00:00:00:c9:5e:8d:06

    Step 3:> alicreate "NAME", "WWN"
    Run the alicreate command with the alias name you want to give to the connected FC HBA, and the WWN number obtained from step 1.

    Example:
    The example below shows creation of an alias name of ESX03_1 for the new host ESX03's 1st HBA, with WWN 10:00:00:00:c9:83:63:1d

    FCSW01:admin> alicreate "ESX03_1", "10:00:00:00:c9:83:63:1d"

    Step 4:> zonecreate "NAME", "ALIASofFCHBA"
    Run the zonecreate command to create a zone for the VMware host server, and use the alias created in step 3 to add the FC HBA to the zone.

    Example:
    The example below shows creation of a zone called ESX03z with the alias ESX03_1 added

    FCSW01:admin> zonecreate "ESX03z", "ESX03_1"

    Step 5:> zoneadd "NAME", "ALIASofSAN(s)"
    Run the zoneadd command to add the aliases of the SAN's FC controller ports to the zone

    Example:
    The example below shows addition of the EVA's controller A port 1 (EVA_ContrAP1) and controller B port 1 (EVA_ContrBP1) to the ESX03z zone.

    FCSW01:admin> zoneadd "ESX03z", "EVA_ContrAP1"
    FCSW01:admin> zoneadd "ESX03z", "EVA_ContrBP1"

    Step 6:> cfgadd "CONFIG_NAME","ZONEtoADD"
    Run the cfgadd command to add the newly create zone to the configuration.

    Example:
    The example below shows the addition of the ESX03z zone to the Company_Default configuration.

    FCSW01:admin> cfgadd "Company_Default","ESX03z"

    Step 7:> cfgsave
    Run the cfgsave command to save the configuration, entering yes to the prompt

    Example:

    FCSW01:admin> cfgsave
    You are about to save the Defined zoning configuration. This action will only save the changes on Defined configuration. Any changes made on the Effective configuration will not take effect until it is re-enabled.
    Do you want to save Defined zoning configuration only? (yes, y, no, n): [no] yes
    ... FCSW01, cfgSave completes successfully. ...

    Step 8:> cfgenable CONFIG_NAME
    Run the cfgenable command to enable the configuration, entering yes to the prompt.

    Example:

    FCSW01:admin> cfgenable Company_Default
    You are about to enable a new zoning configuration. This action will replace the old zoning configuration with the current configuration selected. If the update includes changes to one or more traffic isolation zones, the update may result in localized disruption to traffic on ports associated with the traffic isolation zone changes.
    Do you want to enable 'Company_Default' configuration (yes, y, no, n): [no] yes
    ... zone config "Company_Default" is in effect ...
    Updating flash ...

    Step 9: Repeat
    Repeat Steps 1 to 8 on the other FC Switch, for the VMware hosts 2nd FC HBA, and FC SANs other controller ports.

    THE END

    Note: Instead of adding WWNs to zones, can also designate specific ports to be a member of a zone (a default configuration may have one zone with all ports designated.)

    Example:
    In the example below, instead of defining a WWN for ESX01 (as is done for ESX02), a port number is designated instead:
    alias: ESX01_SP3 1,3
    alias: ESX02 10:00:00:00:c9:5e:8d:06
    + Recent posts