https://ts2019-usa.readthedocs.io/en/latest/karbon/karbon.html
Karbon
The estimated time to complete this lab is 60 minutes.
Overview
Nutanix Karbon is an on-prem turnkey curated enterprise-grade Kubernetes service offering that simplifies the provisioning, operations and lifecycle management of Kubernetes.
Karbon provides a consumer-grade experience for delivering Kubernetes on-prem providing huge savings on OpEx of dedicated DevOps or SRE teams to keep Kubernetes online, up to date or integrated with 3rd party components and tooling.
In this lab you will deploy a Kubernetes cluster using Karbon and then deploy multiple containers, referred to as Kubernetes pods, to run a sample application.
If you already have an understanding of containers, Kubernetes, challenges, and use cases, jump to Lab Setup and Creating a Karbon Cluster.
What are Containers?
A container is a standard unit of software that packages up code and all its dependencies so the application runs quickly and reliably from one computing environment to another. Unlike traditional virtualization, containers are substantially more light-weight than VMs, with many containers capable of sharing the same host OS instance.

Containers provide two key features: a packaging mechanism and a runtime environment.
At the runtime level, the container allows an application to run as an isolated process with its own view of the operating system. While VMs provide isolation via virtualized hardware, containers leverage the ability of the Linux kernel to provide isolated namespaces for individual processes. This lightweight nature means each application gets its own container, preventing dependency conflicts.
As a packaging mechanism, a container is typically just a tarball: a way to bundle the code, configuration and dependencies of an application into a single file. This eliminates the problem of “It worked on my environment, why doesn’t it work on yours,” because everything necessary to run the application consistently is transported with the container. Ideally, applications produce the same output regardless of environment, and containerization makes that ideal a lot easier to reach. The result is a containerized application that will start, stop, make requests and log the same way.
Container Benefits and Issues
For any business, containers represent a large opportunity:
- Developers will spend less time debugging environment issues and more time writing code.
- Server bills will shrink, because more applications can fit on a server using containers than in traditional deployments.
- Containers can run anywhere, increasing the available deployment options.
For complex applications consisting of multiple components, containers vastly simplify updates. Placing each component in a container makes it simple to make changes without having to worry about unintended interactions with other components.
Use cases for containerized workloads include:
- Continuous Integration Continuous Delivery (CI/CD) development
- Application modernization/Microservices
- API, web, and backend app development/delivery
- Application cost containment
- Enabling hybrid cloud
While breaking down applications into microservices, or discrete functional parts, has clear benefits, having more parts to manage can introduce complexities for configuration, service discovery, load balancing, resource scaling, and discovering and fixing failures. Managing this complexity manually isn’t scalable.
Introducing Kubernetes
Kubernetes is an container orchestration platform, open sourced by Google in 2014, that helps manage distributed, containerized applications at massive scale. According to Redmonk, 54 %of Fortune 100 companies are running Kubernetes in some form, with adoption coming from every sector.

Kubernetes delivers production-grade container orchestration, automating container configuration, simplifying scaling, lifecycle management, and managing resource allocation. Kubernetes can run anywhere. Whether you want your infrastructure to run on-premise, on a public cloud, or a hybrid configuration of both.
However, vanilla Kubernetes presents its own challenges that make it difficult for organizations to adopt the technology. Building your own production-ready deployment that ensures the Kubernetes environment itself is robust, easy to maintain (automated), with integrated features for things like networking, logging, analytics, and secret management, could take months.
Kubernetes aggressive, quarterly release cycle (where releases are deprecated by the community after 3 quarters) can create adoption challenges for enterprises. Finally, from a supportability and risk perspective, maintaining your own custom Kubernetes stack for production applications would be analogous to using a custom-made distribution of Linux - virtually unheard of in the enterprise.
As previously stated, Nutanix Karbon provides a turn-key solution to address these critical Kubernetes challenges.
Lab Setup
This lab requires applications provisioned as part of the Windows Tools VM.
If you have not yet deployed this VM, see the linked steps before proceeding with the lab.
It is highly recommended that you connect to the Tools VM using the Microsoft Remote Desktop client rather than the VM console launched via Prism. An RDP connection will allow you to copy and paste between your device and the VMs.
Creating a Karbon Cluster
In this exercise you will create a production ready Kubernetes cluster with Nutanix Karbon.
In Prism Central, select :fa:`bars` > Services > Karbon.

Note
If Karbon has not already been enabled on your cluster, click the Enable Karbon button when prompted. Once clicked, the process should take approximately 2 minutes to complete. During this time Prism Central is deploying the Karbon control plane, which runs as a set of containers within the Prism Central VM.

Click the provided link to launch the Karbon Console.
Note
If at any point your Karbon session times out, you can log in again using your Prism Central admin credentials.
To begin provisioning a Karbon cluster, click + Create Cluster.
On the Name and Environment tab, fill out the following fields:
- Name - Initials-karbon
- Cluster - Select Your Nutanix cluster
- Kubernetes Version - 1.10.3
- Host OS Image - centos
Do NOT use the 1.8.x Kubernetes Version selected by default.

Note
Your cluster has be pre-staged with a compatible CentOS image for use with Karbon.
Karbon currently supports CentOS 7.5.1804 and Ubuntu 16.04 and requires that these images be downloaded directly from Nutanix.
To stage another cluster with the supported CentOS image, add http://download.nutanix.com/karbon/0.8/acs-centos7.qcow2 as “acs-centos”.
To stage another cluster with the supported CentOS image, add http://download.nutanix.com/karbon/0.8/acs-ubuntu1604.qcow2 as “acs-ubuntu”.
Click Next.
Next you will define the number of container host VMs and compute requirements, starting with Worker VMs.
Worker nodes are responsible for running containers deployed onto the Kubernetes cluster. Each Worker node runs the kubelet and kube-proxy services.
For the purposes of this non-production exercise you will reduce the amount of memory consumed by default by each worker and etcd VM.
On the Worker Configuration tab, fill out the following fields:
- Number of Workers - 3 (Default)
- Memory - 6 GiB
- Size - 120 GiB (Default)
- VCPU - 4 (Default)
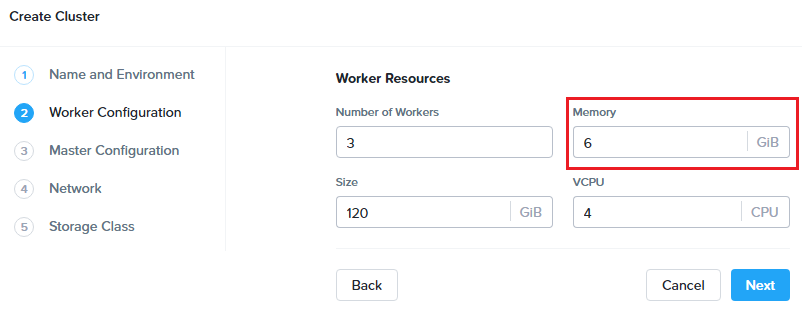
Click Next.
Next you will define the compute requirements for the Master and etcd nodes.
The Master node controls the Kubernetes cluster and provides the kube-apiserver, kube-controller-manager. and kube-scheduler services.
The etcd nodes provide a distributed key-value store which Kubernetes uses to manage cluster state, similar to how Nutanix leverages Zookeeper.
On the Master Configuration tab, fill out the following fields:
- Master Resources > Memory - 4 GiB (Default)
- Master Resources > Size - 120 GiB (Default)
- Master Resources > VCPU - 2 (Default)
- etcd Resources > Number of VMs - 3 (Default)
- etcd Resources > Memory - 4 GiB
- etcd Resources > Size - 40GiB (Default)
- etcd Resources > VCPU - 2 (Default)

Click Next.
Next you will configure the networking for both the host VMs and pods. Karbon utilizes Flannel to provide layer 3 IPv4 network between multiple nodes within the Karbon cluster.
Platforms like Kubernetes assume that each pod (container) has a unique, routable IP inside the cluster. The advantage of this model is that it removes the port mapping complexities that come from sharing a single host IP.
The Service CIDR defines the network range on which services (like etcd) are exposed. The Pod CIDR defines the network range used to IP pods. The default configuration allows for a maximum of 256 nodes with up to 256 pods per node.
On the Network tab, fill out the following fields:
- Network Provider - Flannel (Default)
- VM Network - Primary (Default)
- Service CIDR - 172.19.0.0/16 (Default)
- Pod CIDR - 172.20.0.0/16 (Default)

Click Next.
On the Storage Class tab, fill out the following fields:
- Storage Class Name - default-storageclass-Initials
- Prism Element Cluster - Your Nutanix cluster
- Nutanix Cluster Username - admin
- Nutanix Cluster Password - techX2019!
- Storage Container Name - Default
- File System - ext4 (Default)
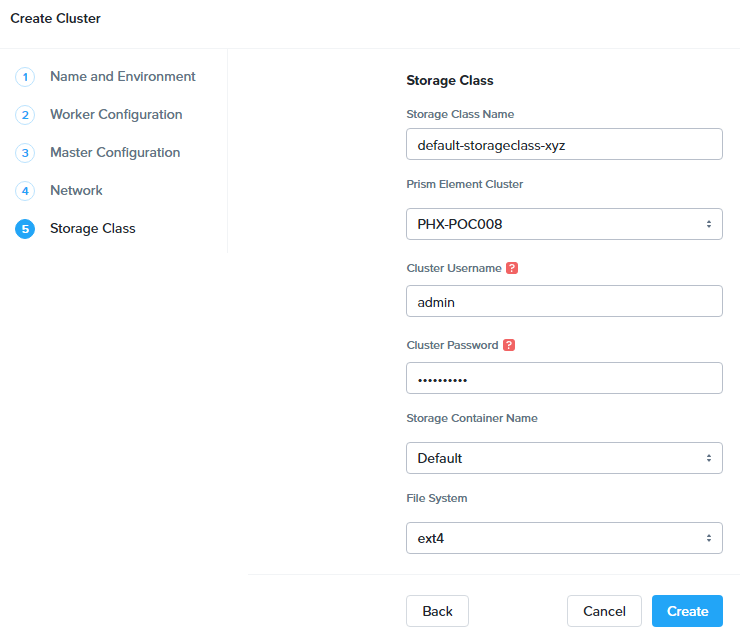
Click Create.
Deployment of the cluster should take approximately 10 minutes. During this time, Karbon is pulling images from public image repositories for the master, etcd, and worker nodes, as well as flannel, the Nutanix Volumes plugin, and any additional Karbon plugins. Support for authenticated proxy and dark site image repositories will be added post-GA.
Filtering VMs for Initials-karbon in Prism Central will display the master, etcd, and worker VMs provisioned by Karbon.

In Prism Element > Storage > Volume Group, Karbon has created the pvc-… Volume Group, used as persistent storage for logging. Karbon leverages the Nutanix Kubernetes Volume Plug-In to present Nutanix Volumes to Kubernetes pods via iSCSI. This allows containers to take advantage of native Nutanix storage capabilities such as thin provisioning, zero suppression, compression, and more.

The Karbon cluster has finished provisioning when the Status of the cluster is Running.

Click on your cluster name (Initials-karbon) to access the Summary Page for your cluster.

Explore this view and note the ability to create and add additional storage classes and persistent storage volumes to the cluster. Additional persistent storage volumes could be leveraged for use cases such as containerized databases.
In 15 minutes or less, you have deployed a production-ready Kubernetes cluster with logging (EFK), networking (flannel), and persistent storage services.
Getting Started with Kubectl
Kubectl is the command line interface for running commands against Kubernetes clusters. Kubeconfig files contain information about clusters, users, namespaces, and authentication. The kubectl tool uses kubeconfig files to find and communicate with a Kubernetes cluster.
In this exercise you will use kubectl to perform basic operations against your newly provisioned Karbon cluster.
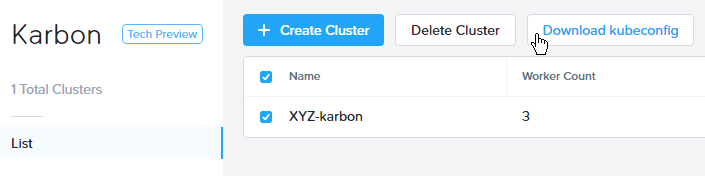
From within your Initials-Windows-ToolsVM VM, browse to Prism Central and open Karbon.
Select your Initials-karbon cluster and click Download kubeconfig.
Open PowerShell.
Note
If installed, you can also use a local instance of kubectl. The Tools VM is provided to ensure a consistent experience.
Instructions for setting up kubectl in Windows and macOS can be found here.
From PowerShell, run the following commands to configure kubectl:
cd ~ mkdir .kube cd .kube mv ~\Downloads\kubectl* ~\.kube\config kubectl get nodes
Note
By default, kubectl looks like a file named config in the ~/.kube directory. Other locations can be specified using environment variables or by setting the --kubeconfig flag.
Verify that the output of the last command shows 1 master node and 3 worker nodes as Ready.
Next you will check the versions of the Kubernetes client and server by running the following command:
kubectl version
Deploying an Application
Now that you have successfully run commands against your Kubernetes cluster using kubectl, you are now ready to deploy an application. In this exercise you will be deploying the popular open-source content management system used for websites and blogs, Wordpress.
Using Initials-Windows-ToolsVM, open PowerShell and create a wordpress directory using the following command:
mkdir ~\wordpress cd ~\wordpress
Kubernetes depends on YAML files to provision applications and define dependencies. YAML files are a human-readable text-based format for specifying configuration information. This application requires two YAML files to be stored in the wordpress directory.
Note
To learn more about Kubernetes application deployment and YAML files, click here.
Using your Initials-Windows-ToolsVM web browser, download the following YAML files for Wordpress and the MySQL deployment used by Wordpress:
- https://kubernetes.io/examples/application/wordpress/mysql-deployment.yaml
- https://kubernetes.io/examples/application/wordpress/wordpress-deployment.yaml
Move both files to the wordpress directory using the following command:
mv ~\Downloads\*.yaml ~\wordpress\ cd ~\wordpress\
Open the wordpress-deployment.yaml file with your preferred text editor.
Note
Sublime Text has been pre-installed on Initials-Windows-ToolsVM.

Under spec: > type:, change the value from LoadBalancer to NodePort and save the file. This change is required as Karbon does not yet support LoadBalancer.

Note
You can learn more about Kubernetes publishing service types here.
Open the mysql-deployment.yaml file and note that it requires an environmental variable to define the MYSQL_ROOT_PASSWORD as part of deployment. No changes are required to this file.

Define the secret to be used as the MySQL password by running the following command:
kubectl create secret generic mysql-pass --from-literal=password=Nutanix/4u!
Verify the command returns secret/mysql-pass created.
You can also verify the secret has been created by running the following command:
kubectl get secrets
Verify mysql-pass appears in the NAME column.
You will now provision the MySQL database by running the following command:
kubectl create -f mysql-deployment.yaml

In addition to the MySQL service, the mysql-deployment.yaml also specifies that a persistent volume be created as part of the deployment. You can get additional details about the volume by running:
kubectl get pvc
You will note that the STORAGECLASS matches the default-storageclass-Initials provisioned by Karbon.
The volume also appears in Karbon under Initials-karbon > Volume.

To view all running pods on the cluster, which should currently only be your Wordpress MySQL database, run the following command:
kubectl get pods
To complete the application, deploy Wordpress by running the following command:
kubectl create -f wordpress-deployment.yaml
Verify both pods are displayed as Running using kubectl get pods.
Accessing Wordpress
You have confirmed the Wordpress application and its MySQL database are running. Configuration of Wordpress is done via web interface, but to access the web interface you must first determine the IP addresses of our worker VMs and the port on which the pod is running.
The IP addresses of all cluster VMs is returned by the kubectl describe nodes command. You can run this and search for the InternalIP of any of your worker VMs, or run the following command to return only the hostnames and IP addresses:
kubectl describe nodes | Select-String -Pattern "Hostname:","InternalIP"

To determine the port number of the Wordpress application, run the following command and note the TCP port mapped to port 80:
kubectl get services wordpress

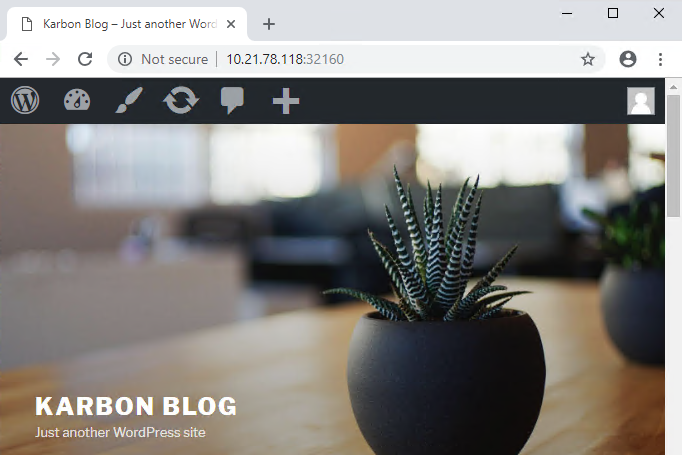
Open http://WORKER-VM-IP:WORDPRESS SERVICE PORT/ in a new browser tab to access to Wordpress installation.
Note
In the example shown, you would browse to http://10.21.78.72:32160. You environment will have a different IP and port.

Click Continue and fill out the following fields:
- Site Title - Initials’s Karbon Blog
- Username - admin
- Password - nutanix/4u
- Your Email - noreply@nutanix.com
Click Install Wordpress.
After setup completes (a few seconds), click Log In and provide the credentials just configured.
Congratulations! Your Wordpress application and MySQL database setup is complete.
Exploring Logging & Visualization
Karbon provides a plug-in architecture to continually add additional functionality on top of vanilla Kubernetes. The firdst plug-in Karbon will provide is an integrated logging services stack called EFK, short for Elasticsearch, fluentd and Kibana.
Elasticsearch is a real-time, distributed, and scalable search engine which allows for full-text and structured search, as well as analytics. It is commonly used to index and search through large volumes of log data, but can also be used to search many different kinds of documents.
Elasticsearch is commonly deployed alongside Kibana, a powerful data visualization frontend and dashboard for Elasticsearch. Kibana allows you to explore your Elasticsearch log data through a web interface, and build dashboards and queries to quickly answer questions and gain insight into your Kubernetes applications.
Fluentd is a popular data collector that runs on all Kubernetes nodes to tail container log files, filter and transform the log data, and deliver it to the Elasticsearch cluster, where it will be indexed and stored.
Return to the Karbon Console and select your Initials-karbon cluster.
Select Add-on from the sidebar to view and manage available Karbon plugins.

Select Logging to launch the Kibana user interface.
Select Discover from the sidebar and define * as the Index Pattern. This wildcard will retrieve all available indices within Elastisearch, including etcd, kubernetes, and systemd.
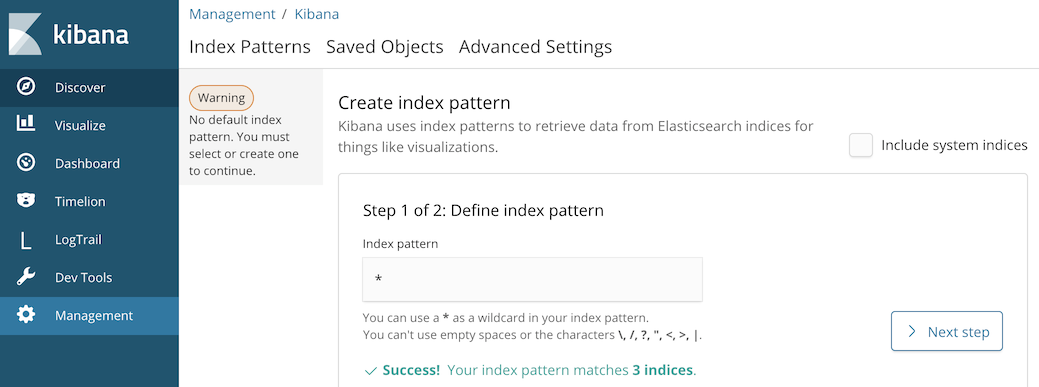
Click Next Step.
Select @timestamp from the Time Filter field name drop down menu to allow you to sort logging entries by their respective timestamps.
Click Create index pattern.
Select Discover again from the sidebar to view all logs from the Karbon cluster. You can reduce the amount of Kubernetes metadata displayed by adding the log entry under Available Fields.

Advanced Kibana usage, including time series data visualization that can answer questions such as “What is the difference in service error rates between our last 3 application upgrades,” is covered in the Kibana User Guide.
Coming Soon!
The upcoming Karbon 1.0 GA is ready for production workloads. Additional features and functionality include:
- Pre-configured Production and Dev/Test cluster profiles to further simplify provisioning
- Multi-Master VM support to provide an HA Kubernetes control plane
- Active/passive Multi-Master HA out of the box
- Support for 3rd party load balancers
- The ability to add/remove worker node(s) to deployed clusters
- Cluster level monitoring & alerting using Prometheus, an open-source systems monitoring and alerting system with an embedded time-series database originally developed by SoundCloud.
- New Nutanix Container Storage Interface (CSI) Driver Support
- CSI is the standard for exposing arbitrary block and file storage storage systems to Kubernetes
- Support for Nutanix Volumes and Nutanix Files
- Upgrades & Patching
- Non-disruptive Karbon upgrades
- Immutable OS upgrades of all cluster nodes
- Support for native Kubernetes RBAC
- Rotating 24-hour key-based access to cluster to minimize malicious activity
- Darksite Support
- Local read-only image repository for offline cluster deployments for customers that do not allow internet access
Takeaways
What are the key things you should know about Nutanix Karbon?
- Any Nutanix AHV customer is a potential target for Karbon, including:
- Customers that perform internal development
- Customers who have or plan to adopt CI/CD
- Customers with Digital Transformation or Application Modernization initiatives
- The primary benefit of Karbon is reduced CapEX and OpEX of managing and operating Kubernetes environments, reducing learning curve and enabling DevOps/ITOps teams to quickly support their development teams to start deploying containerized workloads.
- Karbon delivers One-Click operations for Kubernetes provisioning and lifecycle management, enabling enterprises to provide a private-cloud Kubernetes solution with the simplicity and performance of public clouds.
- Karbon is included in all AOS software editions at no additional cost.
- Karbon can provide additional functionality to Kubernetes over time through its plugin architecture.
- Karbon will be a certified Kubernetes distribution and has passed the Kuberentes Conformance Certification.
- Karbon is listed on the official Kubernetes Solutions and Cloud Native Computing Foundation Landscape pages.
Cleanup
Once your lab completion has been validated, PLEASE do your part to remove any unneeded VMs to ensure resources are available for all users on your shared cluster.
IF you DO NOT intend on completing either the Cloud Native or Xi Epoch labs, THEN you should delete the Initials-karbon cluster deployed as part of this exercise. This can be done directly from the Karbon web interface.
IF you DO intend on completing either the Cloud Native or Xi Epoch labs, THEN you should leave your Initials-karbon cluster in place.
Getting Connected
Have a question about Nutanix Karbon? Please reach out to the resources below:
Karbon Product Contacts
| Slack Channel | #karbon |
| Product Manager | Denis Guyadeen, dguyadeen@nutanix.com |
| Product Marketing Manager | Maryam Sanglaji, maryam.sanglaji@nutanix.com |
| Technical Marketing Engineer | Dwayne Lessner, dwayne@nutanix.com |
| NEXT Community Forum | https://next.nutanix.com/kubernetes-containers-30 |
Additional Kubernetes Training Resources
- Introduction to Kubernetes - Free introductory training by The Linux Foundation
- Play with Kubernetes - Free introductory training and lab environment by Docker
- Scalable Microservices with Kubernetes - Free intermediate training by Google
'Nutanix' 카테고리의 다른 글
| K8s (0) | 2019.09.18 |
|---|---|
| Bonding active-slave 변경 (0) | 2019.07.01 |
| Helpful Nutanix Commands Cheat Sheet (0) | 2019.07.01 |
| Nutanix - component master node 찾기 (0) | 2019.07.01 |
| Data intensive ?? (0) | 2019.03.28 |