https://www.ibm.com/developerworks/community/blogs/meyawi/entry/dlpar_issues_with_cloned_aix_lpar?lang=en
'IBM AIX > VIOS' 카테고리의 다른 글
| VIOS HOW TO (0) | 2016.09.26 |
|---|---|
| vios (0) | 2016.07.19 |
| LPM by IBM (0) | 2016.07.18 |
| LPM (0) | 2016.07.18 |
| VSCSI (0) | 2016.07.18 |
https://www.ibm.com/developerworks/community/blogs/meyawi/entry/dlpar_issues_with_cloned_aix_lpar?lang=en
| VIOS HOW TO (0) | 2016.09.26 |
|---|---|
| vios (0) | 2016.07.19 |
| LPM by IBM (0) | 2016.07.18 |
| LPM (0) | 2016.07.18 |
| VSCSI (0) | 2016.07.18 |
The PCIe2 10 GbE RoCE Adapter is preconfigured to operate in the AIX® RoCE mode. A network that uses RDMA provides better performance than an adapter that is used as a NIC for network-intensive applications. This mode is often helpful for network storage or high-performance computing.
# lsdev -C | grep icm# mkdev -c management -s infiniband -t icm# ibstat roce0# lsdev -C -c adapter# ifconfig en1 down detach; ifconfig en2 down detach# chdev -l hba0 -a stack_type=aix_ib # cfgmgr# lsdev -C -c adapterroce0 Avaliable 00-00-00 PCIe2 10GbE RoCE Converged Network Adapter
hba0 Available 00-00-00 PCIe2 10GbE RoCE Converged Host Bus Adapter (b315506714101604)
| AIX H/W RAID Disk replacement (0) | 2016.09.07 |
|---|---|
| HMC 에서 vio 설치 (0) | 2016.09.01 |
| S824 MES (0) | 2016.08.16 |
| RMC (0) | 2016.07.18 |
| sh history (1) | 2016.06.01 |
http://www-01.ibm.com/support/docview.wss?uid=isg3T1011040
Cluster Aware AIX (CAA)
http://lparbox.com/how-to/aix/13
http://aixnote.tistory.com/226
http://www-01.ibm.com/support/docview.wss?uid=isg3T1013047
VIO Server Howto
| VIOS DLPAR (0) | 2017.08.31 |
|---|---|
| vios (0) | 2016.07.19 |
| LPM by IBM (0) | 2016.07.18 |
| LPM (0) | 2016.07.18 |
| VSCSI (0) | 2016.07.18 |
# diag
---> Task Selection
---> RAID Array Manager
---> PCI-X SCSI Disk Array Manager
---> List PCI-X SCSI Disk Array Configuration
---> sisioa1 Available 06-08 PCI-X Dual Channel U320 SCSI RAID
Activate the LED indicator of the physical disk to locate it on the rack.
# diag
---> Task Selection
---> Hot Plug Task
---> SCSI and SCSI RAID Hot Plug Manager
---> Replace/Remove a Device Attached to an SCSI Hot Swap Enclosure
---> select failed disk here(pdisk#)
A message will appear in regards to an LED and Remove state. Find the physical drive that is now flashing amber from its LED and remove it from the array. After you remove the failed physical drive, replace it with the new unit.
Hit Enter on that message screen to remove that slot from the "remove state".
# diag
---> Task Selection
---> Hot Plug Task
---> SCSI and SCSI RAID Hot Plug Manager
---> Configure Added/Replaced Devices
# diag
---> Task Selection
---> Log Repair Action (Select affected disk)
Rebuild the array
# diag
---> Task Selection
---> RAID Array Manager
---> PCI-X SCSI Disk Array Manager
---> Reconstruct a PCI-X SCSI Disk Array
| https://www.ibm.com/support/knowledgecenter/en/ssw_aix_61/com.ibm.aix.networkcomm/roce_rdmaconfiguration.htm (0) | 2017.05.11 |
|---|---|
| HMC 에서 vio 설치 (0) | 2016.09.01 |
| S824 MES (0) | 2016.08.16 |
| RMC (0) | 2016.07.18 |
| sh history (1) | 2016.06.01 |
HMC의 vio 이미지로 vio 설치 방법
https://theibmi.org/2014/11/26/how-to-install-any-operating-system-on-power-remotly/
| https://www.ibm.com/support/knowledgecenter/en/ssw_aix_61/com.ibm.aix.networkcomm/roce_rdmaconfiguration.htm (0) | 2017.05.11 |
|---|---|
| AIX H/W RAID Disk replacement (0) | 2016.09.07 |
| S824 MES (0) | 2016.08.16 |
| RMC (0) | 2016.07.18 |
| sh history (1) | 2016.06.01 |
igure 1. Memory module plugging sequence
| Number of system processors | Plugging sequence |
|---|---|
| One system processor module (8286-41A, 8286-42A, or 8247-42L) |
|
| Two system processor modules (8286-42A or 8247-42L) |
|
|
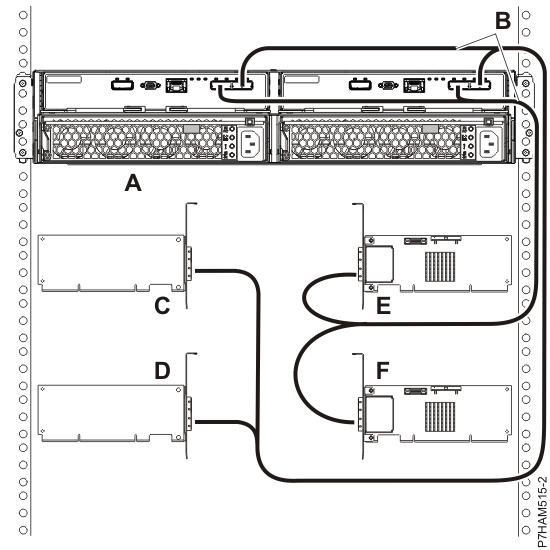
http://www.ibm.com/support/knowledgecenter/en/8247-42L/p8had/p8had_sascabling5887.htm?cp=8286-42A
|
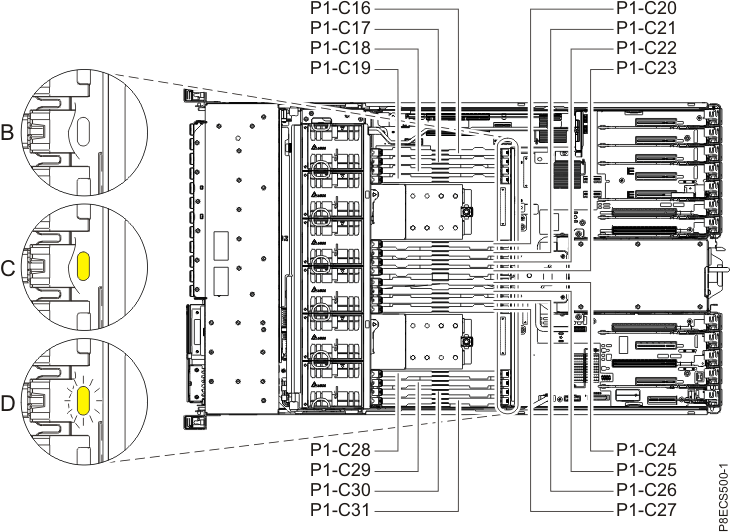
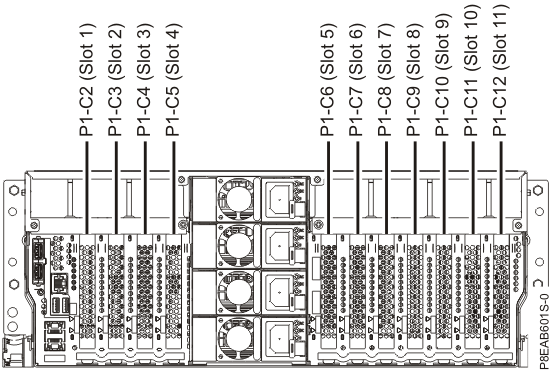
http://www.ibm.com/support/knowledgecenter/en/8286-42A/p8eab/p8eab_82x_84x_slot_details.htm
| AIX H/W RAID Disk replacement (0) | 2016.09.07 |
|---|---|
| HMC 에서 vio 설치 (0) | 2016.09.01 |
| RMC (0) | 2016.07.18 |
| sh history (1) | 2016.06.01 |
| sh history (0) | 2016.06.01 |
Contents
Run IOS commands as root
What is the AIX command behind an ioscli command?
IOS - Information and Maintenance
List all ioscli commands
IOS Version
Apply IOS Fixes
IOS Upgrade Procedure
Reboot the VIO Server
Virtual Devices: Storage
List unmapped disks
List all Disk Mappings
Create a Virtual SCSI Host Adapter
Remove a Virtual SCSI Host Adapter
Assign a Disk/LV to a Virtual SCSI Host Adapter
Unassign a Disk/LV from a Virtual SCSI Host Adapter
Virtual Devices: Fibre Channel
Create a Virtual Fibre Channel Adapter
List Virtual Fibre Channels
List NPIV Capable Ports
Assign a Physical FC Adapter to a Virtual Fibre Channel Adapter
Unassign a Physical FC Adapter from a Virtual Fibre Channel Adapter
Virtual Devices: Network
List Shared Ethernet Adapters
Create a Shared Ethernet Adapter
Enable SEA Load Sharing Mode
Perform a Manual SEA Failover
Show SEA Satus
List Links on Physical Ethernet Adapters
Set a local IP Address
Remove a local IP Address
1. Run IOS commands as root
According to IBM you should never work as root on VIO servers. However, if you login as user padmin and type
oem_setup_env
you get the root credentials (without even been asked for a password).
By default the ioscli commands are not available for the root user. All ioscli commands are in fact calls of /usr/ios/cli/ioscli with the command as argument. You see this if you list the aliases of the padmin user.
Knowing this you can use all ioscli commands as user root by appending /usr/ios/cli/ioscli. Instead of »lsmap -all« you would type
root@vios# /usr/ios/cli/ioscli lsmap -all
If you set an alias
alias i=/usr/ios/cli/ioscli
you could even type
root@vios# i lsmap -all
2. What is the AIX command behind an ioscli command?
If you want to know what AIX command is behind the command you issued as user padmin you can use a special debug mode:
$ export CLI_DEBUG=33
That's the output of the lsnports command in this mode:
$ lsnports
AIX: "/usr/lib/methods/viosmgr -t npiv -f query_fc_ports >/dev/null"
name physloc fabric tports aports swwpns awwpns
fcs0 U789C.001.DQDH231-P1-C2-T1 1 64 64 2048 2047
fcs1 U789C.001.DQDH231-P1-C2-T2 1 64 62 2048 2043
IOS - Information and Maintenance
1. List all ioscli commands
$ help
You can type
$ help <command>
to display a command's syntax, e.g
$ help lsmap
Usage: lsmap {-vadapter ServerVirtualAdapter | -plc PhysicalLocationCode |
-all} [-type BackingDeviceType ... | -net | -npiv ]
[-field FieldName ...] [-fmt delimiter]
lsmap -ams {-vtd PagingDevice | -all}
[-type BackingDeviceType ... ]
[-field FieldName ...] [-fmt delimiter]
lsmap -clustername ClusterName {-all | -hostname}
Displays the mapping between physical and virtual devices.
-all Displays mapping for all the server virtual adapter
devices. Defaults to VSCSI adapter devices.
-clustername Specifies the cluster name.
-hostname Specifies the host name.
-vadapter Specifies the server virtual adapter device
by device name.
-plc Specifies the server virtual adapter device
by physical location code.
-vtd Specifies the (AMS)Active Memory Sharing
Paging Device to be displayed.
-type Specifies to display virtual devices whose backing
device matches the type given.
-net Specifies supplied device is a virtual server
Ethernet adapter.
-npiv Displays NPIV binding information.
-ams Displays (AMS)Active Memory Sharing paging space
device information.
-field Specifies a list of fields to be displayed.
-fmt Divides output by a user-specified delimiter.
2. IOS Version
$ ioslevel
2.2.0.10-FP-24
3. Apply IOS Fixes
Put the IOS fixes somewhere in a local directory or on an NFS server (e.g. /mnt/iosfixes). Then run
$ updateios -dev /mnt/iosfixes -accept
4. IOS Upgrade Procedure
It is highly recommended first to clone the running installations to free disks (here: hdisk2 and hdisk3). That way we can always go back to the old working installation:
$ oem_setup_env
# alt_disk_copy -B -d "hdisk2 hdisk3"
# exit
Read the release notes. You may need to upgrade the VIO server in two steps (e.g. first to 2.2.2.1 and than further to 2.2.2.5).
Then put the IOS upgrade packages somewhere in a local directory or on an NFS server (e.g. /updates/2.2.2.5) and run
$ updateios -commit
$ updateios -dev /updates/2.2.2.5 -accept -install
$ shutdown -restart
5. Reboot the VIO Server
$ shutdown -restart
Virtual Devices: Storage
1. List unmapped disks
$ lspv -free
NAME PVID SIZE(megabytes)
hdisk24 none 8631
hdisk25 none 8631
hdisk26 none 8631
hdisk27 none 8631
Warning: If you use vendor specific device drivers (such as the SDD or EMC drivers) you see all hdisks as free. You have to limit the list to your logical devices, e.g.
$ lspv -free | grep vpath
2. List all Disk Mappings
$ lsmap -all
SVSA Physloc Client Partition ID
--------------- -------------------------------------------- ------------------
vhost1 U9117.570.65E12FB-V1-C102 0x0000000a
VTD vtscsi1
LUN 0x8100000000000000
Backing device hdisk6
Physloc U7879.001.DQDHXYN-P1-C4-T1-W50050763041302AA-L4021400000000000
VTD vtscsi8
LUN 0x8200000000000000
Backing device hdisk14
Physloc U7879.001.DQDHXYN-P1-C4-T1-W50050763041302AA-L4031400100000000
VIOS Profile: Add Virtual SCSI Adapter
3. Create a Virtual SCSI Host Adapter
This has to done on the HMC for the profile of the VIO server: You create a new Virtual SCSI Host-Adapter and assign it only to your client LPAR.
The same slot ID should then be assigned to a new client adapter in the client LPAR's profile.
You can do these steps dynamically to avoid a restart of the VIO server. Use the Dynamic Logical Partitioning option for that. If you go for the dynamic option don't forget to do the same assignments in the profiles aswell, otherwise your LPAR loses all storage after a new start of the VIOS!
After dynamically adding the server hostadapters you have to rerun the configuration mamager before you can see the new vhost device:
$ cfgdev
4. Remove a Virtual SCSI Host Adapter
$ rmdev -dev vhostX [ -recursive ]
The option »-recursive« can be used to remove all still attached child devices.
Then remove the adapters dynamically from the VIO server aswell as from the VIOS' profile.
5. Assign a Disk/LV to a Virtual SCSI Host Adapter
To map hdisk22 to vhost1 just type
$ mkvdev -vdev hdisk22 -vadapter vhost1
vtscsi19 available
The VIO server assigns the next free number (19 here) and creates the mapping device vtscsi19. But you can specify your own name for the mapping device by making use of the »-dev« option:
$ mkvdev -vdev hdisk22 -dev vthdisk22_barney -vadapter vhost1
vthdisk22_barney available
If you use LVs rather than whole disks or LUNs the same rules apply:
# default mapping device
$ mkvdev -vdev lpar21_lv03 -vadapter vhost1
vtscsi19 available
# custom mapping device
$ mkvdev -vdev lpar21_lv03 -dev vtdisk21_lv03 -vadapter vhost1
vtdisk21_lv03 available
6. Unassign a Disk/LV from a Virtual SCSI Host Adapter
$ rmvdev -vtd vtscsiXX
Virtual Devices: Fibre Channel
IBM introduced the support of NPIV technology with VIOS (Virtual I/O Sever) 2.1 with a client AIX running either AIX 5.3 TL9 or later, or AIX 6.1 TL2 or later, or AIX 7.1. Earlier releases are not supported.
1. Create a Virtual Fibre Channel Adapter
This has to done on the HMC for the profile of the VIO server: You create a new Virtual Server Fibre Channel adapter and assign it to only one client LPAR.
The same slot ID should then be assigned to a new Client Fibre Channel adapter in the client LPAR's profile.
2. List Virtual Fibre Channels
$ lsmap -all -npiv
Name Physloc ClntID ClntName ClntOS
------------- ---------------------------------- ------ -------------- -------
vfchost0 U8203.E4A.05A6DD1-V1-C41 3 mylpar6 AIX
Status:LOGGED_IN
FC name:fcs1 FC loc code:U789C.001.DQDH231-C3-T2
Ports logged in:2
Flags:a<LOGGED_IN,STRIP_MERGE>
VFC client name:fcs0 VFC client DRC:U8203.E4A.05A6DD1-V3-C41-T1
Name Physloc ClntID ClntName ClntOS
------------- ---------------------------------- ------ -------------- -------
vfchost1 U8203.E4A.05A6DD1-V1-C43 4 mylpar8 AIX
Status:LOGGED_IN
FC name:fcs1 FC loc code:U789C.001.DQDH231-C3-T2
Ports logged in:2
Flags:a<LOGGED_IN,STRIP_MERGE>
VFC client name:fcs0 VFC client DRC:U8203.E4A.05A6DD1-V4-C43-T1
3. List NPIV Capable Ports
NPIV = N_port ID Virtualization
$ lsnports
name physloc fabric tports aports swwpns awwpns
fcs0 U789C.001.DQDH231-P1-C2-T1 1 64 64 2048 2047
fcs1 U789C.001.DQDH231-P1-C2-T2 1 64 62 2048 2043
4. Assign a Physical FC Adapter to a Virtual Fibre Channel Adapter
$ vfcmap -vadapter vfchost0 -fcp fcs1
5. Unassign a Physical FC Adapter from a Virtual Fibre Channel Adapter
There isn't a separate command for this action - you just leave the argument after -fcp empty:
$ vfcmap -vadapter vfchost0 -fcp
Virtual Devices: Network
1. List Shared Ethernet Adapters
$ lsmap -all -net
SVEA Physloc
------ --------------------------------------------
ent12 U9117.570.65E12FB-V2-C20-T1
SEA ent13
Backing device ent3
Physloc U7311.D20.651372C-P1-C01-T2
2. Create a Shared Ethernet Adapter
To create a Shared Ethernet Adapter (SEA) you need:
a physical adapter as backend: <PHYS>
a virtual adapter as defined in the VIOS' profile: <VIRT>
an internal VLAN ID: <VLAN>
If you use the Shared Ethernet Adapter Failover capability of recent IOS releases you also need
a second virtual adapter as defined in the VIOS' profile: <CONT>
for the control channel:
# simple:
$ mkvdev -sea <PHYS> -vadapter <VIRT> -default <VIRT> -defaultid <VLAN>
# Shared Ethernet Adapter Failover:
$ mkvdev -sea <PHYS> -vadapter <VIRT> -default <VIRT> -defaultid <VLAN> -attr ha_mode=auto ctl_chan=<CONT>
Example: To create a Shared Ethernet Adapter on top of an virtual adapter ent11 using VLAN 20, the physical adapter ent2 as backend, and the virtual adapter ent13 for the control channel type:
$ mkvdev -sea ent2 -vadapter ent11 -default ent11 -defaultid 20 -attr ha_mode=auto ctl_chan=ent13
3. Enable SEA Load Sharing Mode
First on the primary SEA, then on the secondary:
$ chdev -dev <SEA> -attr ha_mode=sharing
4. Show SEA Satus
Let's say for the SEA ent20:
$ entstat -all ent20 | grep '^[ ]*State'
State: PRIMARY
Other possible states: BACKUP, PRIMARY_SH, BACKUP_SH. The states PRIMARY_SH and BACKUP_SH are indicating that Load Sharing Mode has been enabled.
5. Perform a Manual SEA Failover
To perform a failover for the SEA ent20 go to the active side ("State: PRIMARY") and type:
$ chdev -dev ent20 -attr ha_mode=standby
The SEA on the other VIO server automatically becomes active. To switch back you would type
$ chdev -dev ent20 -attr ha_mode=auto
6. List Links on Physical Ethernet Adapters
$ netstat -cdlistats | grep -Ei "\(ent|media|link status"
ETHERNET STATISTICS (ent3) :
Link Status : Up
Media Speed Selected: 100 Mbps Full Duplex
Media Speed Running: 100 Mbps Full Duplex
7. Set a local IP Address
To configure an local IP 192.168.1.2 address to en0 use
$ mktcpip -hostname <HOSTNAME> \
-inetaddr 192.168.1.2 \
-interface en0 -start \
-netmask 255.255.255.0 \
-gateway <GATEWAY>
8. Remove a local IP Address
If you want to remove the IP configuration from en0, type
$ rmtcpip -interface en0
(c) unixwerk Content is available under the BSD Documentation License.
| VIOS DLPAR (0) | 2017.08.31 |
|---|---|
| VIOS HOW TO (0) | 2016.09.26 |
| LPM by IBM (0) | 2016.07.18 |
| LPM (0) | 2016.07.18 |
| VSCSI (0) | 2016.07.18 |
RMC (Resource Monitoring and Control):
RMC is a distributed framework and architecture that allows the HMC to communicate with a managed logical partition. RMC daemons should be running on AIX partition in order to be able to do DLPAR operations on HMC.
For example "Dynamic LPAR Resource Manager" is an RMC daemon that runs inside the AIX (and VIO server). The HMC uses this capability to remotely execute partition specific commands.
The daemons in the LPARs and the daemons on the HMC must be able to communicate to the AIX partition through an external network not through the Service Processor. An external network that the partition has access to and the HMC has acces to as well.
For example, if HMC has a connection to a 9.x.x.x network and I put my AIX partition to that 9.x.x.x network and as long there is network connectivity (HMC is allowed to communicate to that partition over that network) and RMC daemon is running on the partition, then DLPAR operations are available.
In order for RMC to work, port 657 upd/tcp must be open in both directions between the HMC public interface and the lpar.
The RMC daemons are part of the Reliable, Scalable Cluster Technology (RSCT) and are controlled by the System Resource Controller (SRC). These daemons run in all LPARs and communicate with equivalent RMC daemons running on the HMC. The daemons start automatically when the operating system starts and synchronize with the HMC RMC daemons.
Note: Apart from rebooting, there is no way to stop and start the RMC daemons on the HMC!
----------------------------------------
HMC and LPAR authentication (RSCT authentication)
(RSCT authentication is used to ensure the HMC is communicating with the correct LPAR.)
Authentication is the process of ensuring that another party is who it claims to be.
Authorization is the process by which a cluster software component grants or denies resources based on certain criteria.
The RSCT component that implements authorization is RMC. It uses access control list (ACL) files to control user access to resources.
The RSCT authorization process in detail:
1. On the HMC: DMSRM pushes down a secret key and HMC IP address to NVRAM where AIX LPAR exists.
2. On the AIX LPAR: CSMAgentRM, reads the key and HMC IP address out from NVRAM. It will then authenticate the HMC. This process is repeated every five minutes on a LPAR to detect new HMCs.
3. On the AIX LPAR: After authenticating the HMC, CSMAgentRM will contact the DMSRM on the HMC to create a ManagedNode resource then it creates a ManagementServer resource on AIX.
4. On the AIX LPAR: After the creation of these resources on the HMC and AIX, CSMAgentRM grants HMC permission to access necessary resources on the LPAR and changes its ManagedNode Status to 1 on the HMC.
5. On the HMC: After the ManagedNode Status is changed to 1, a session is established with the LPAR to query operating system information and DLPAR capabilities, and then waits for the DLPAR commands from users.
----------------------------------------
RMC Domain Status
When partitions have active RMC connections, they become managed nodes in a Management Domain. The HMC is then the Management Control Point (MCP) of that Management Domain. You can then use the rmcdomainstatus command to check the status of those managed nodes (i.e. your partitions).
As root on the HMC or on the AIX LPAR you can execute the rmcdomainstatus command as follows:
# /usr/sbin/rsct/bin/rmcdomainstatus -s ctrmc
From HMC: You should get a list of all the partitions that the HMC server can reach on the public network on port 657.
Management Domain Status: Managed Nodes
O a 0xc8bc2c9647c1cef3 0003 9.2.5.241
I a 0x96586cb4b5fc641c 0002 9.2.5.33
From LPAR: You should get a list of all the Management Control Points
Management Domain Status: Management Control Points
I A 0xef889c809d9617c7 0001 9.57.24.139
1. column:
-I: Indicates that the partition is "Up" as determined by the RMC heartbeat mechanism (i.e. an active RMC connection exists).
-O: Indicates that the RMC connection is "Down", as determined by the RMC heartbeat mechanism.
2. column:
-A: Indicates that there are no messages queued to the specified node
-a: Same as A, but the specified node is executing a version of the RMC daemon that is at a lower code level than the local RMC daemon.
more info: https://www-304.ibm.com/support/docview.wss?uid=isg3T1011508
----------------------------------------
If rmcdomainstatus shows "i" at (1st column):
Indicates that the partition is Pending Up. Communication has been established, but the initial handshake between two RMC daemons has not been completed (message authentication is most likely failing.)
Authentication problems will occur when the partition identity do not match each other's trusted host list:
# /usr/sbin/rsct/bin/ctsvhbal <--list the current identities for the HMC and the logical partition (run this command on both)
# /usr/sbin/rsct/bin/ctsthl -l <--list the trusted host list on the partition
On the HMC, there is an entry for the partition. On the partition, there is an entry for the HMC. The HOST_IDENTITY value must match one of the identities listed in the respective ctsvhbal command output.
----------------------------------------
Things to check at the HMC:
- checking the status of the managed nodes: /usr/sbin/rsct/bin/rmcdomainstatus -s ctrmc (you must be root on the HMC)
- checking connection between HMC and LPAR:
hscroot@hmc10:~> lspartition -dlpar
<#0> Partition:<2*8204-E8A*0680E12 aix10.domain.com, 10.10.50.18>
Active:<1>, OS:<AIX, 6.1, 6100-03-01-0921>, DCaps:<0x4f9f>, CmdCaps:<0x1b, 0x1b>, PinnedMem:<1452>
<#1> Partition:<4*8204-E8A*0680E32 aix20.domain.com, 10.10.50.71>
Active:<0>, OS:<AIX, 6.1, 6100-04-05-1015>, DCaps:<0x0>, CmdCaps:<0x1b, 0x1b>, PinnedMem:<656>
For correct DLPAR function:
- the partition must return with the correct IP of the lpar.
- the active value (Active:...) must be higher than zero,
- the decaps value (DCaps:...) must be higher 0x0
(The first line shows a DLPAR capable LPAR, the second line is anon-working LPAR)
- another way to check RMC connection: lssyscfg -r lpar -F lpar_id,name,state,rmc_state,rmc_ipaddr -m p750
(It should list "active" for the LPARs with active RMC connection.)
----------------------------------------
Things to check at the LPAR:
- checking the status of the managed nodes: /usr/sbin/rsct/bin/rmcdomainstatus -s ctrmc
- Checking RMC status:
# lssrc -a | grep rsct
ctrmc rsct 8847376 active <--it is a RMC subsystem
IBM.DRM rsct_rm 6684802 active <--it is for executing the DLPAR command on the partition
IBM.DMSRM rsct_rm 7929940 active <--it is for tracking statuses of partitions
IBM.ServiceRM rsct_rm 10223780 active
IBM.CSMAgentRM rsct_rm 4915254 active <--it is for handshaking between the partition and HMC
ctcas rsct inoperative <--it is for security verification
IBM.ERRM rsct_rm inoperative
IBM.AuditRM rsct_rm inoperative
IBM.LPRM rsct_rm inoperative
IBM.HostRM rsct_rm inoperative <--it is for obtaining OS information
You will see some active and some missing (The key for DLPAR is the IBM.DRM)
- Stopping and starting RMC without erasing configuration:
# /usr/sbin/rsct/bin/rmcctrl -z <--it stops the daemons
# /usr/sbin/rsct/bin/rmcctrl -A <--adds entry to /etc/inittab and it starts the daemons
# /usr/sbin/rsct/bin/rmcctrl -p <--enables the daemons for remote client connections
(This is the correct method to stop and start RMC without erasing the configuration.)
Do not use stopsrc and startsrc for these daemons; use the rmcctrl commands instead!
- recfgct: deletes the RMC database, does a discovery, and recreates the RMC configuration
# /usr/sbin/rsct/install/bin/recfgct
(Wait several minutes)
# lssrc -a | grep rsct
(If you see IBM.DRM active, then you have probably resolved the issue)
- lsrsrc "IBM.ManagementServer" <--it shows HMCs via RMC
| HMC 에서 vio 설치 (0) | 2016.09.01 |
|---|---|
| S824 MES (0) | 2016.08.16 |
| sh history (1) | 2016.06.01 |
| sh history (0) | 2016.06.01 |
| Power Systems - 2015 4Q Announce overview (0) | 2016.04.04 |
http://www.ibm.com/developerworks/aix/library/au-LPM_troubleshooting/
Live Partition Mobility (LPM) was introduced on Power6. It helps to avoid downtime during VIOS and firmware updates when migrating to other frames. LPM also reduces the amount of work that is required while creating a new LPAR and set-up, which is required for the application.
A majority of customers perform LPM activities on a daily basis, and many may not know the exact procedure or what is taking place. This article shows steps to overcome or fix LPM issues.

Things to remember about LPM are that it migrates running partitions from one physical server to another while maintaining complete transactional integrity and transfers the entire environment: processor state, memory, virtual devices, and connected users. Partitions may also migrate while powered off (inactive migration), and the operating system and application must reside on shared storage.
You must have a minimum of two machines, a source and a destination, on POWER6 or higher with the Advanced Power Virtualization Feature enabled. The operating system and application must reside on a shared external storage (Storage Area Network). In addition to these hardware requirements, you must have:
Your virtual I/O servers (VIOS) must have a Shared Ethernet Adapter (SEA) configured to bridge to the same Ethernet network which the mobile partition uses. It must be capable of providing virtual access to all the disk resources which the mobile partition uses (NPIV or vSCSI). If you are using vSCSI, then the virtual target devices must be physical disks (not logical volumes).
You must be at AIX version 5.3J or later, VIOS version 1.4 or later, HMC V7R310 or later and the firmware at efw3.1 or later.

The following describes the general LPM depiction in Figure 2:
Before doing LPM, we need to verify the availability of resources on both the source and destination side. If validation fails with some error, then we have to fix it to proceed further. Sometimes validation may end up with warning messages which can be ignored.
Figure 3 shows you how to validate the LPAR with the HMC GUI.
From the System management -> Servers -> Trim screen, select the LPAR name: Operations -> Mobility -> Validate

The validate screen, shown in Figure 4, shows that upt0052 LPAR is validated for migration from trsim to dash, and if needed, we have to specify the destination HMC.

Figure 5 show that the LPM has ended with a warning message, ignore the message and select Close to continue with the migration.

Figure 6, the Partition Migration Validation screen, shows that the information is selected to set up a migration of the partition to a different managed system. Select Migrate to verify the information.

When the migration completes, as shown in Figure 7, select Close

To validate the LPM in local HMC, enter the following:
migrlpar -o v -m [source cec] -t [target cec] -p [lpar to migrate]
To validate the LPM in the Remote HMC, type:
migrlpar -o v -m [source cec] -t [target cec] -p [lpar to migrate] \
> --ip [target hmc] -u [remote user]
Note, you may prefer to use the hscroot command as the remote user.
Use the following migration command for LPM in the local HMC:
migrlpar -o m -m [source cec] -t [target cec] -p [lpar to migrate]
The following migration command for LPM is used with the remote HMC:
migrlpar -o m -m [source cec] -t [target cec] -p [lpar to migrate] \
> --ip [target hmc] -u [remote user]
In case of MPIO (Multipath IO) failure of a LPAR due to configuration issues between source and destination, type the following to proceed (if applicable):
migrlpar -o m -m wilma -t visa -p upt07 --redundantpgvios 0 -n upt07_n
oams_npiv -u hscroot --vlanbridge 2 --mpio 2 -w 60 -d 5 -v -i
"source_msp+name=wilmav2,dest_msp_name=visav2" --ip destiny4
This section covers various errors messages you might encounter and ways to correct them.
mkauthkey error displays:hscroot@destiny4:~> migrlpar -o v -m trim -p UPT0052 --ip hmc-arizona -u hscroot -t arizona HSCL3653 The Secure Shell (SSH) communication configuration between the source and target Hardware Management Consoles has not been set up properly for user hscroot. Please run the mkauthkeys command to set up the SSH communication authentication keys.
To overcome this error, type the following:
hscroot@destiny4:~> mkauthkeys -g --ip hmc-arizona -u hscroot
Enter the password for user hscroot on the remote host hmc-arizona
hscroot@destiny4:~> migrlpar -o v -m trim -p
    UPT0052 --ip hmc-liken -u hscroot -t wilma

HSCLA318 The migration command issued to the destination HMC failed with the
following error: HSCLA335 The Hardware Management Console for the destination
managed system does not support one or more capabilities required to perform
this operation. The unsupported capability codes are as follows: AME_capability
hscroot@destiny4:~>
To correct this error either migrate to POWER7 or remove the AME and then migrate.
hscroot@hmc-liken:~> migrlpar -o v -m wilma -t visa --ip destiny4 -u hscroot -p
upt0060 --mpio 2

Errors:
HSCLA304 A suitable shared memory pool for the mobile partition was not found on the
destination managed system. In order to support the mobile partitions, the
destination managed system must have a shared memory pool that can accommodate the
partition's entitled and maximum memory values, as well ad its redundant paging
requirements. If the destination managed system has a shared memory pool, inability
to support the mobile shared memory partition can be due to lack of sufficient memory
in the pool, or lack of a paging space device in the pool that meets the mobile
partition's redundancy and size requirements.

Details:
HSCLA297 The DLPAR Resource Manager (DRM) capability bits )x) for mover service
partition (MSP) visav2 indicate that partition mobility functions are not supported
on the partition.
HSCLA2FF An internal Hardware Management Console error has occurred. If this error
persists, contact your service representative.
To correct this error do either, or both, of the following:
hscroot@destiny4:~> migrlpar -o v -m dash -t arizona --ip hmc-arizona -u hscroot
-p upt0053

Errors:
HSCLA224 The partition cannot be migrated because it has been designated to use a
processor compatibility level that is not supported by the destination managed
system. Use the HMC to configure a level that is compatible with the destination
managed system.
The solution for the above error could be one of the following:
The steps to change processor mode in HMC GUI are:
hscroot@destiny4:~> migrlpar -o v -m dash -t arizona --ip hmc-arizona -u hscroot
-p upt0058

Errors:
The migrating partition's virtual SCSI adapter cannot be hosted by the existing
virtual I/O server (VIOS) partitions on the destination managed system. To
migrate the partition, set up the necessary VIOS hosts on the destination
managed system, then try the operation again.

Details:
HSCLA356 The RMC command issued to partition arizona failed. This means that
destination VIOS partition arizona2 cannot host the virtual adapter 6 on the
migrating partition.

HSCLA29A The RMC command issued to partition failed.
The partition command is:
migmgr -f find_devices -t vscsi -C 0x3 -d 1
The RMC return code is:
0
The OS command return code is:
85
The OS standard out is:
Running method '/usr/lib.methods/mig_vscsi
85
The OS standard err is:

The search was performed for the following device descriptions:
        <v-scsi-host>
                 <generalInfo>
                    <version>2.0 </version>
                    <maxTransfer>262144</maxTransfer>
                    <minVIOSpatch>0</minVIOSpatch>
                    <minVIOScompatability>1</minVIOScompatability>
                    <effectiveVIOScompatability>1</effectiveVIOScompatability>
                  <generalInfo>
                  <ras>
                        <partitionID>2</partitionID>
                   </ras>
                   <virtDev>
                            <vLUN>
                                        <LUA>0x81000000000000000</LUA>
                                        <LUNState>0</LUNState>
                                        <clientReserve>no</clientReserve>
                                        <AIX>
                                                <type>vdasd</type>
                                                <connWhere>1</connWhere>
                                        </AIX>
                            </vLUN>
                            <blockStirage>
                                        <reserveType>NI_RESERVE</reserveType>
                                        <AIX>

                           <udid>261120017380003D30194072810XIV03IBMfcp</udid>
                                                <type>UDID</type>
                                        </AIX>
                            </blockStirage>
                    </virtDev>
     </v-scsi-host>
And, the solution is as follows:
In cases where the mapping is correct, and you are still getting the same error, it may be due to having different types of FC adapters between source and destination MSP. For mapping methods, refer to last Note section of "Troubleshooting".
hscpe@destiny4:~> migrlpar -o v -m dash -t wilma -p upt0053 --ip defiant2 -u
hscroothmc-arizona -u hscroot
Errors:
The partition cannot be migrated because the processing resources it requires
exceeds the available processing resources in the destination managed system's
shared processor pool. If possible, free up processing resources from that shared
processor pool and try the operation again.
And the solution is:
hscpe@destiny4:~> migrlpar -o v -m extra5 -t dash -p upt0027
Errors:
There is not enough memory: Obtained: 2816, Required: 4608.  Check that there is
enough memory available to activate the partition. If not, create a new profile or
modify the existing profile with the available resources, then activate the
partition. If the partition must be activated with these resources, deactivate any
running partition or partitions using the resource, then activate this partition.
And, the solution is either:
If the RMC (Resource Monitoring and Control) connection is not established among the source, target VIOS's and LPAR, then we may get following error:
hscpe@destiny4:~> migrlpar -o v -m dash -t trim -p upt0053
Errors:
The operation to check partition upt0053 for migration readiness has failed.
The partition command is:
drmgr -m -c pmig -p check -d 1
The partition standard error is:

HSCLA257 The migrating partition has returned a failure response to the HMC's
request to perform a check for migration readiness. The migrating partition in
not ready for migration at this time. Try the operation again later.

Details:
HSCLA29A  The RMC command issued to partition upt0053 failed. \
The partition commend is:
drmgr -m -c pmig -p check -d 1
The RMC return code is:
1141
The OS command return code is:
0
The OS standard out is:
Network interruption occurs while RMC is waiting for the execution of the command
on the partition to finish.
Either the partition has crashed, the operation has caused CPU starvation, or
IBM.DRM has crashed in the middle of the operation.
The operation could have completed successfully. (40007) (null)
The OS standard err is:hscroote@hmc-liken:~> migrlpar -o v -m wilma -t visa --ip destiny4 -u hscroot -p upt0060 Errors: HSCLA340 The HMC may not be able to replicate the source multipath I/O configuration for the migrating partition's virtual I/O adapters on the destination. This means one or both of the following: (1) Client adapters that are assigned to different source VIOS hosts may be assigned to a single VIOS host on the destination; (2) Client adapters that are assigned to a single source VIOS host may be assigned to different VIOS hosts on the destination. You can review the complete list of HMC-chosen mappings by issuing the command to list the virtual I/O mappings for the migrating partition. HSCLA304 A suitable shared memory pool for the mobile partition was not found on the destination managed system. In order to support the mobile partition, the destination managed system must have a shared memory pool that can accommodate the partition's entitled and maximum memory values, as well as its redundant paging requirements. If the destination managed system has a shared memory pool, inability to support the mobile shared memory partition can be due to lack of sufficient memory in the pool, or lack of a paging space device in the pool that meets the mobile partition's redundancy and size requirements. Details: HSCLA297 The DLPAR Resource Manager (DRM) capability bits 0x0 for mover service partition (MSP) visav2 indicate that partition mobility functions are not supported on the partition. HSCLA2FF An internal Hardware Management Console error has occurred. If this error persists, contact your service representative. Warning: HSCLA246 The HMC cannot communicate migration commands to the partition visav2. Either the network connection is not available or the partition does not have a level of software that is capable of supporting partition migration. Verify the correct network and migration setup of the partition, and try the operation again.
The solution is:
If above solution is not feasible to implement then:
--mpio 2 with the migrlpar command. By using this, we may lose dual VIOS setup for MPIO disks. Generally this is not a recommended solution by PowerVM.hscroote@hmc-liken:~> migrlpar -o v -m wilma -t visa --ip destiny4 -u hscroot -p upt0060 Errors: HSCLA340 The HMC may not be able to replicate the source multipath I/O configuration for the migrating partition's virtual I/O adapters on the destination. This means one or both of the following: (1) Client adapters that are assigned to different source VIOS hosts may be assigned to a single VIOS host on the destination; (2) Client adapters that are assigned to a single source VIOS host may be assigned to different VIOS hosts on the destination. You can review the complete list of HMC-chosen mappings by issuing the command to list the virtual I/O mappings for the migrating partition. HSCLA304 A suitable shared memory pool for the mobile partition was not found on the destination managed system. In order to support the mobile partition, the destination managed system must have a shared memory pool that can accommodate the partition's entitled and maximum memory values, as well as its redundant paging requirements. If the destination managed system has a shared memory pool, inability to support the mobile shared memory partition can be due to lack of sufficient memory in the pool, or lack of a paging space device in the pool that meets the mobile partition's redundancy and size requirements. Details: HSCLA297 The DLPAR Resource Manager (DRM) capability bits 0x0 for mover service partition (MSP) visav2 indicate that partition mobility functions are not supported on the partition. HSCLA2FF An internal Hardware Management Console error has occurred. If this error persists, contact your service representative. Warning: HSCLA246 The HMC cannot communicate migration commands to the partition visav2. Either the network connection is not available or the partition does not have a level of software that is capable of supporting partition migration. Verify the correct network and migration setup of the partition, and try the operation again.
When we verify in VIOS:
lsmap -all -npiv
Name        Physloc                           ClntID  ClntName     ClntOS
----------- --------------------------------- ------- ------------ ------
vfchost3    U9117.MMB.100302P-V1-C14             5      upt0052      AIX

Status:LOGGED_IN
FC name:fcs0                   FC  loc code:U78C0.001.DBJ0563-P2-C1-T1
Ports logged in:35
Flags:a<LOGGED_IN,STRIP_MERGE>
VFC client name:fcs1            VFC client DRC:U8233.E8B.100244P-V5-C4-T1
Name        Physloc                           ClntID  ClntName     ClntOS
----------- --------------------------------- ------- ------------ ------
vfchost3    U9117.MMB.100302P-V1-C13

Status:LOGGED_IN
FC name:fcs0                   FC  loc code:U78C0.001.DBJ0563-P2-C1-T1
Ports logged in:0
Flags:4<NOT_LOGGED>
VFC client name:                VFC client DRC
Here the problem is vfchost3 and vfchost8 both mapped to same host (upt0058) and both mapped to same physical FC(fcs0). This is not the recommended setup. To fix this use either of these methods:
hscroot@guandu5:~> migrlpar -o v -m flrx -t dash --ip destiny4  -u hscroot -p
    upt0064
HSCLA319 The migrating partition's virtual fibre channel client adapter 4
cannot be hosted by the existing Virtual I/O Server (VIOS) partitions on
the destination managed system. To migrate the partition, set up the
necessary VIOS host on the destination managed system, then try the
operation again.
HSCLA319 The migrating partition's virtual fibre channel client adapter 3
cannot be hosted by the existing Virtual I/O Server (VIOS) partitions on
the destination managed system. To migrate the partition, set up the
necessary VIOS host on the destination managed system, then try the
operation again.

Details:
HSCLA356 The RMC command issued to partition dashv1 failed. This means that
destination VIOS partition dashv1 cannot host the virtual adapter 4 on the
migrating partition.
HSCLA29A The RMC command issued to partition dashv1 failed.
The partition command is:
migmgr -f find_devices -t vscsi -C 0x3 -d 1
The RMC return code is:
0
The OS command return code is:
69
The OS standard out is:
Running method '/usr/lib/methods/mig_vscsi'
69

The OS standard err is:


The search was performed for the following device description:
      <vfc-server>
               <generalInfo>
                   <version>2.0 </version>
                   <maxTransfer>1048576</maxTransfer>
                   <minVIOSpatch>0</minVIOSpatch>
                   <minVIOScompatability>1</minVIOScompatability>
                   <effectiveVIOScompatability>-1</effectiveVIOScompatability>
                   <numPaths>1</numPaths>
                   <numPhysAdapPaths>1</numPhysAdapPaths>
                   <numWWPN>34</numWWPN>
                   <adpInterF>2</adpInterF>
                   <adpCap>5</adpCap>
                   <linkSpeed>400</linkSpeed>
                   <numIniat>6</numIniat>
                   <activeWWPN>0xc0507601a6730036</activeWWPN>
                   <inActiveWWPN>0xc0507601a6730037</inActiveWWPN>
                   <nodeName>0xc0507601a6730036</nodeName>
                   <streamID>0x0</streamID>
                <generalInfo>
                  <ras>
                        <partitionID>1</partitionID>
                   </ras>
                  <wwpn_list>
                                <wwpn>0x201600a0b84771ca</wwpn>
                                <wwpn>0x201700a0b84771ca</wwpn>
                                <wwpn>0x202400a0b824588d</wwpn>
                                <wwpn>0x203400a0b824588d</wwpn>
                                <wwpn>0x202500a0b824588d</wwpn>
                                <wwpn>0x203500a0b824588d</wwpn>
                                <wwpn>0x5005076303048053</wwpn>
                                <wwpn>0x5005076303098053</wwpn>
                                <wwpn>0x5005076303198053</wwpn>
                                <wwpn>0x500507630319c053</wwpn>
                                <wwpn>0x500507630600872d</wwpn>
                                <wwpn>0x50050763060b872d</wwpn>
                                <wwpn>0x500507630610872d</wwpn>
                                <wwpn>0x5005076306ib872d</wwpn>
                                <wwpn>0x500a098587e934b3</wwpn>
                                <wwpn>0x500a098887e934b3</wwpn>
                                <wwpn>0x20460080e517b812</wwpn>
                                <wwpn>0x20470080e517b812</wwpn>
                                <wwpn>0x201400a0b8476a74</wwpn>
                                <wwpn>0x202400a0b8476a74</wwpn>
                                <wwpn>0x201500a0b8476a74</wwpn>
                                <wwpn>0x202500a0b8476a74</wwpn>
                                <wwpn>0x5005076304108e9f</wwpn>
                                <wwpn>0x500507630410ce9f</wwpn>
                                <wwpn>0x50050763043b8e9f</wwpn>
                                <wwpn>0x50050763043bce9f</wwpn>
                                <wwpn>0x201e00a0b8119c78</wwpn>
                                <wwpn>0x201f00a0b8119c78</wwpn>
                                <wwpn>0x5001738003d30151</wwpn>
                                <wwpn>0x5001738003d30181</wwpn>
                                <wwpn>0x5005076801102be5</wwpn>
                                <wwpn>0x5005076801102dab</wwpn>
                                <wwpn>0x5005076801402be5</wwpn>
                                <wwpn>0x5005076801402dab</wwpn>
                    </wwpn_list>

   <vfc-server>
The solution can be any one of the following (or it may fail due to other mismatching characteristic of target FC adapters):
Sometimes the configuration log at the time of validation or migration is required to debug the errors. To get the log, run the following command from source MSP:
alog -t cfg -o > cfglog
NPIV mapping steps for LPM:
vSCSI mapping steps for LPM:
As per the prerequisites for LPM section for doing LPM, the LPAR should not have any physical adapters, but if it is a POWER7, it can have Host Ethernet Adapter (Integrated Virtualized Ethernet) attached to it. However, for a POWER7 LPAR which you want to migrate to other POWER7 can have HEA attached to it, but we must create etherchannel on a newly created virtual adapter and HEA in aggregation mode. When we migrate at the target we see only virtual adapter configured with IP and etherchannel; HEA will not be migrated. Also, make sure the VLANs used in virtual adapters to create etherchannel are added to both source and target VIOS.
Before LPM:
# lsdev -Cc adapter
ent0  Available       Logical Host Ethernet Port (lp-hea)
ent1  Available       Logical Host Ethernet Port (lp-hea)
ent2  Available       Logical Host Ethernet Port (lp-hea)
ent3  Available       Logical Host Ethernet Port (lp-hea)
ent4  Available       Virtual I/O Ethernet Port (l-lan)
ent7  Available       Virtual I/O Ethernet Port (l-lan)
ent6  Available       Virtual I/O Ethernet Port (l-lan)
ent7  Available       Virtual I/O Ethernet Port (l-lan)
ent8  Available       EtherChannel / 802.3ad Link Aggregation
ent9  Available       EtherChannel / 802.3ad Link Aggregation
ent10 Available       EtherChannel / 802.3ad Link Aggregation
ent11 Available       EtherChannel / 802.3ad Link Aggregation
fcs0  Available C3-T1 Virtual Fibre Channel Adapter
fcs1  Available C3-T1 Virtual Fibre Channel Adapter
lhea0 Available       Logical Host Ethernet Adapter (l-hea)
lhea1 Available       Logical Host Ethernet Adapter (l-hea)
vsa0  Available       LPAR Virtual Serial Adapter
[root@upt0017] /
In this case doing LPM is also a bit different compared to the earlier method; this has to be done from the LPAR using smitty (also called client side LPM), not from HMC. But, LPAR must install with SSH fileset to do LPM through smitty.
openssh.base.client
openssh.base.server
openssh.license
openssh.man.en_US
openssl.base
openssl.license
openssl.man.en_US
Use smitty to migrate an Power7 LPAR with HEA. Smit --> Applications will be the first step to do LPM from smitty.
# smit

System Management
Move cursor to desired item and press Enter

  Software Installation and Maintenance
  Software License Management
  Mange Edition
  Devices
  System Storage Management  *Physical & Logical Storage)
  Security & User
  Communication Applications and Services
  Workload Partition Administration
  Print Spooling
  Advanced Accounting
  Problem Determination
  Performance & Resource Scheduling
  System Environments
  Processes & Subsystems
  Applications
  Installation Assistant
  Electronic Service Agent
  Cluster Systems Management
  Using SMIT (information only)
After selecting "Applications", then select "Live Partition Mobility with Host Ethernet Adapter (HEA)" to proceed.
Move cursor to desired item and press Enter

Live Partition Mobility with Host Ethernet Adapter (HEA)
Next enter the required fields such as source and destination HMC and HMC users, source and destination managed system names, LPAR name.
                   Live Partition Mobility with Host Ethernet Adapter (HEA)

Type or select values in the entry fields.
Press Enter AFTER making all desired changes

                                                     [Entry Fields]
* Source HMC Hostname or IP address                [destinty2]
* Source HMC Username             [hscroot]
* Migration between two HMCs                         no
        Remote HMC hostname or IP address          [ ]
        Remote HMC Username                        [ ]
*Source System                                     [link]
* Destination System                               [king]
* Migrating Partition Name                         [upt0017]
* Migration validation only                          yes
Once the successful migration the smitty command output says OK.
Command Status

Command: OK            stdout: yes           Stderr: no
Before command completion, additional instruction may appear below.

Setting up SSH credentials wit destinty2
If prompted for a password, please enter password for user hscroot on HMC destinty2
Verifying EtherChannel configuration ...
Modifying EtherChannel configuration for mobility ...
Starting partition mobility process. This process is complete.
DO NOT halt or kill the migration process. Unexpected results may occur if the migration
process is halted or killed.
Partition mobility process is complete. The partition has migrated.
After successful LPM, all HEA's will be in defined state, but still the etherchannel between HEA and Virtual adapter exists and IP is still configured on Etherchannel.
[root@upt0017] /
# lsdev -Cc adapter

ent0   Defined             Logical Host Ethernet Port  (lp-hea)
ent1   Defined             Logical Host Ethernet Port  (lp-hea)
ent2   Defined             Logical Host Ethernet Port  (lp-hea)
ent3   Defined             Logical Host Ethernet Port  (lp-hea)
ent4   Available           Virtual I/O Ethernet Adapter  (l-lan)
ent5   Available           Virtual I/O Ethernet Adapter  (l-lan)
ent6   Available           Virtual I/O Ethernet Adapter  (l-lan)
ent7   Available           Virtual I/O Ethernet Adapter  (l-lan)
ent8   Available           EtherChannel  /  IEEE 802.3ad Link Aggregation
ent9   Available           EtherChannel  /  IEEE 802.3ad Link Aggregation
ent10  Available           EtherChannel  /  IEEE 802.3ad Link Aggregation
ent11  Available           EtherChannel  /  IEEE 802.3ad Link Aggregation
fcs0   Available  C3-T1    Virtual Fibre Channel Client Adapter
fcs1   Available  C4-T1    Virtual Fibre Channel Client Adapter
lhea0  Defined             Logical Host Ethernet Adapter  (l-hea)
lhea1  Defined             Logical Host Ethernet Adapter  (l-hea)
vsa0   Available           LPAR Virtual Serial Adapter
[root@upt0017] /
# netstat -i
Name  Mtu    Network      Address            Ipkts   Ierrs        Opkts  Oerrs  Coll
en8   1500   link#2      0.21.5E.72.AE.40    9302210    0       819878     0       0
en8   1500   10.33       upt0017.upt.aust    9302210    0       819978     0       0
en9   1500   link#3      0.21.5e.72.ae.52      19667    0          314     2       0
en9   1500   192.168.17  upt0017e0.upt.au      19667    0          314     2       0
en10  1500   link#4      0.21.5e.72.ae.61      76881    0         1496     0       0
en10  1500   192.168.18  upt0017g0.upt.au      76881    0         1496     0       0
en11  1500   link#5      0.21.5e.72.ae.73       1665    0         2200     2       0
en11  1500   192.168.19  upt0017d0.upt.au       1665    0         2200     2       0
lo0   16896  link#1                          1660060    0       160060     0       0
lo0   16896  loopback    localhost ''        1660060    0       160060     0       0
lo0   16896  ::1%1                           1660060    0       160060     0       0
[root@upt0017] /
#
Additional enhancements are: